

help | join | login | report bug
New to Potshot? Read this page, trust me, you will wish you had after your first uninformed fight! The next thing you will want to do, is take a look around the shop and see what is available. Many of the images in Potshot can be clicked on, and will provide you with more information about that item.
The weapons in the shop are based on actual weapons, and as such require the correct type of ammo. For example, the Sig Sauer P229 is a 9mm weapon, so you will need to buy some 9mm rounds from the ammo section before you can use it.
 +
+  = Time to Rock'n'Roll!
To buy an item from the shop, simply click the BUY button. For certain items like Kevlar Vests, you will have the option of buying a replacement if you currently own a damaged Kevlar Vest.
Before you fight, you should equip the items that you wish to use. These remain equipped until you either equip another item of the same type, or the item is destroyed in battle (like a Kevlar Helmet).
Once you have chosen your equipment, click the FIGHT button at the end of the fight section. Potshot will look for other players who wish to fight at that time, and hook you up. You will then be asked if you wish to place a wager on the match (optional). Once both players are ready, the battle screen will load and you're ready to fight!
The battle screen has three main sections, Your Board, the Enemy Board, and the Event Log
On Your Board, you will see your Avatar and the following five items:-
 Cash
Cash
 Medikit
 Explosive Barrels
 Flashbang
 Frag Grenade
Each turn, you can either Move, Attack, or Reload.
To move, click a square on Your Board, adjacent to your Avatar, and then click the MOVE button that appears. You can only move to a square that has not been attacked before. Squares that have been attacked are considered to be under fire, and will be darkened.
Taking an Item is counted as a Move. When you Take an Item, your Avatar will Move into that square.
To Reload at any time, click your Avatar on Your Board, and click the RELOAD button. This action takes a whole turn.
To Attack, click a square on the Enemy Board and click the ATTACK button that appears. If the Enemy is on the square you choose, the Event Log will tell you how much damage you inflicted. If your attack missed the Enemy, the Event Log will tell you how far you missed by. Understanding the numbers the Event Log shows you is a very important part of the game! Lets look at an example:-
The Player doesn't know the Enemy's location, and decides to Attack (C,3)...
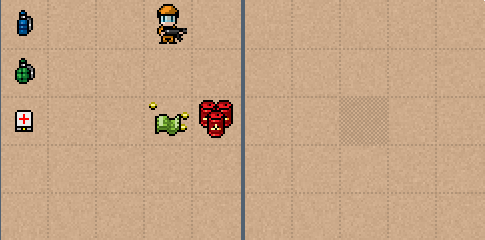
The Event Log replies...

1.41 you say? What is going on? This value is the actual distance between the center of square (C,3) and the center of the Enemy's square. Lets take a closer look at why it is 1.41...
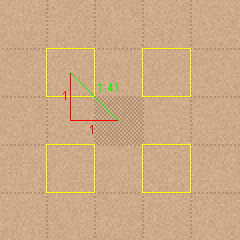
The Enemy could be in one of four squares based on the value of 1.41 as each of these squares is exactly 1.41 units from (C,3). Using the Pythagorean Theorem, we see that for the distance to be 1.41, the Enemy would have to be one square left (or right), and one square up (or down) from (C,3). You don't HAVE to use the Pythagorean Theorem, an educated guess will usually do!
Now, instead of Attacking each of the Yellow squares until we hit the Enemy (and possibly wasting four turns), we are going to do something a little smarter. We can narrow down the possibilities by attacking somewhere else first. For example, lets attack (A,2)...
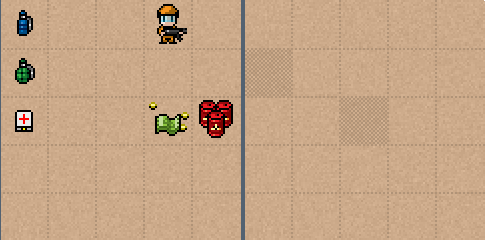
The Event Log replies...

Missed by 3. Lets see which squares are exactly 3 units away from (A,2)...
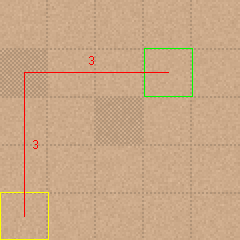
Both the Green and Yellow squares are exactly 3 units from (A,2), and you will also notice that the Green Square is one of the possibilities shown to us by the previous Attack. Logic dictates that the Green square must be the location of the Enemy, so get your Frag Grenade out, its time for a roast!
Our next Attack would be (D,2). By using the numbers this way, we have hit our Enemy by the third turn. If we had simply Attacked the four Yellow squares, we may not have hit the Enemy until our fifth turn, by which time the Enemy may have moved away. Stay sharp, use the numbers, and happy fragging ;)
To make things a little easier, here is a cheat sheet showing the Missed by distances...
 | ||||